Hello lovelies!
Don't you just love this time of year?
Springtime is always a welcome visitor for me bringing loads of beautiful colours after the grey dreary days of winter...
I took some photos of some pink cherry blossom trees recently in readiness for when
I had five mins to myself to dabble with some Free Motion Embroidery.
Free Motion embroidery is also known as Free Machine Embroidery and allows you much more flexibility to draw with threads, colours, patterns and textures.
I love it!
It gives the freedom to create designs in an organic way.
You can choose how small or large you want your stitches and in what direction
you want them to lay.
I thought it would make a nice tutorial for those of you wanting to have a go...
Free Motion Embroidery Tutorial
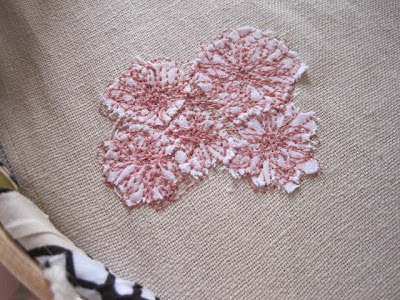
Firstly you need to decide on a design to work out your basic shapes...
If possible take loads of photos to help decide the angle you want to concentrate your design on.
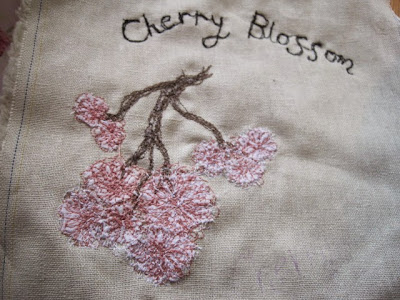
Originally I was going to try and recreate the whole cherry tree but then decided to scale down the design for some more detail.
I wanted it to be a medley of fluffy marshmallows!
The next thing is to use your photos to help draw some simple shapes...
* To get your machine ready you will need to thread it up for straight stitching.
You can have the top thread the same colour as the bobbin thread or experiment with a mixture of the two to create various blending options.
* Change your machine all purpose foot to a Free Motion foot. This allows you freedom to move your fabric around freely.
* You will need to lower your feed dogs (the gripper teeth below the presser foot). Check your instruction manual if you are unsure how you need to do this.
You can add a darning plate if your machine is unable to drop the feed dogs.
* Set your stitch length to a medium length
* Place your fabric inside a wooden embroidery hoop to prevent puckering.
You can cover your hoop with a cotton fabric to create an even tighter fit if you wish.
Next comes the exciting part....
Playing with threads!
You can use ordinary cotton or polyester sewing threads or treat yourself to some machine embroidery threads that add a special silky finish to your designs.
You can either work directly onto your fabric or add extra fabric shapes to add additional colour to your designs...
As you press your machine pedal down move your hoop around slowly to get used to the needle moving up and down. It is a different way of sewing and it will take a while to feel confident with moving your hoop.
Build your design slowly...
Experiment with different colours to form the various elements of your picture.
When you feel more confident why not have a go at writing with your sewing machine?
The possibilities are endless...
I do hope you enjoy experimenting...
I know you'll be hooked when you do eventually work out what style you enjoy.
As an extra try changing fabrics, threads, colours and designs...
Don't forget you can embellish your projects on top of your embroidery with beads, sequins, buttons, lace etc
Have fun being creative my lovelies!
Tilly
x x x


Gorgeous!
ReplyDeleteJulie xxxxxxxx
Thank you :) Glad you enjoyed it!
DeleteTilly x
The cherry blossom looks so good , need to have a go.
ReplyDeleteThanks Maureen!
Deletehave fun doodling with your machine :)
Lovely work...thank you for sharing your knowledge so freely x
ReplyDelete